validation with scikit-learn
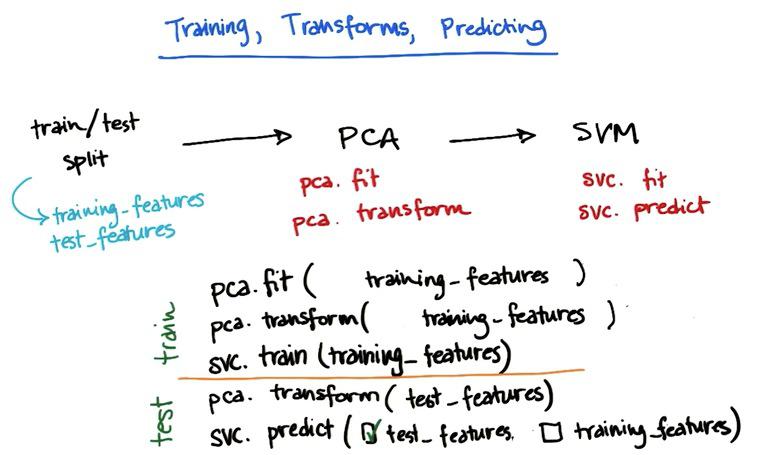
With separate training and testing dataset, we would know how are the performance of our learning model against dataset that haven't been seen. In this way we know how our model generalize if there's new examples. It also acts as a background check whether your model is overfitting. It may cause dataset shortage, but it's kind of step that is worth for. Keep in mind that every machine learning algorithm fit in the training set, not in a test set. If you fit in a test set, and score also in the test set, you definitely would have high performance. And that's called tremendous CHEATING in machine learning.
To do this in scikit-learn, you can look at the documentation. Here's the code snippet from Udacity:
""" this example borrows heavily from the example
    shown on the sklearn documentation:

    http://scikit-learn.org/stable/modules/cross_validation.html

"""

from sklearn import datasets
from sklearn.svm import SVC

iris = datasets.load_iris()
features = iris.data
labels = iris.target

###############################################################
### YOUR CODE HERE
###############################################################

### import the relevant code and make your train/test split
### name the output datasets features_train, features_test,
### labels_train, and labels_test

### set the random_state to 0 and the test_size to 0.4 so
### we can exactly check your result

from sklearn import cross_validation

features_train,features_test,labels_train,labels_test = cross_validation.train_test_split(features,labels, test_size=0.4, random_state=0)

###############################################################

clf = SVC(kernel="linear", C=1.)
clf.fit(features_train, labels_train)

print clf.score(features_test, labels_test)


##############################################################
def submitAcc():
    return clf.score(features_test, labels_test)
Using K-Fold rather than train/test
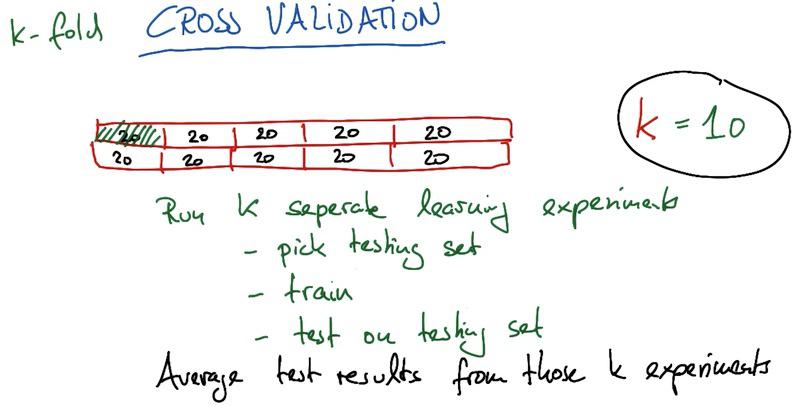
Another method is using K-Fold, where you split our dataset into K units. You narrow the test set to 1 units, and K-1 units as training set. Then we take iterative K-steps with different test bin each steps, springing K units test results. Then you average the results. This will give you max accuracy, as all bagging method, but gives up to longer training time than usual.
Here's the code snippet using K-Fold in authors' emai example:
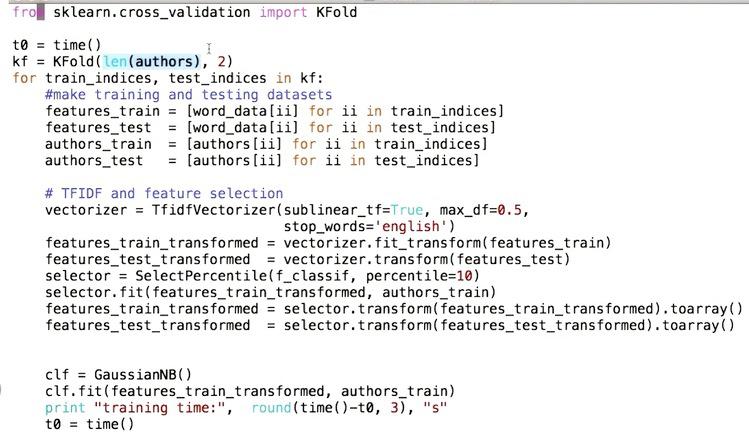
Using K-Fold and train/test wouldn't shuffle your data in scikit-learn. Sometimes you have dataset that have labeled in order. This will gives you bad performance in your model, as you perhaps split the training into one label, and test on the other label. That's why perform shuffle first before doing any kinds of machine learning process. Of course, scikit-learn have this additional parameter for shuffling.
#without shuffling
cv = KFold( len(authors), 2 )
#with shuffling
cv = KFold( len(authors), 2, shuffle=True )
There's another rising problem that, you tweak each of the parameter of your algorithm to achieve best performance. This could be boring work. Cross Validation takes away this problems and perform automatic testing and tuning parameters. This called GridCV in scikit-learn, and you can have quantitative learning model that has list of values with respect to parameters.
Mini Project
As usual, because this blog post are the note that I have taken from Udacity course, you can see the link of the course for this note at the bottom of the page. Here I attack some of the problem they have at their mini project.
GridCV is a way of systematically working through multiple combinations of parameter tunes, cross-validating as it goes to determine which tune gives the best performance. The beauty is that it can work through many combinations in only a couple extra lines of code.
Here's an example from the sklearn documentation, which can be found here:
parameters = {'kernel':('linear', 'rbf'), 'C':[1, 10]} svr = svm.SVC() clf = grid_search.GridSearchCV(svr, parameters) clf.fit(iris.data, iris.target)
Let's break this down line by line.
parameters = {'kernel':('linear', 'rbf'), 'C':[1, 10]} A dictionary of the parameters, and the possible values you want to try for them. In this case, they're playing around with the kernel (possible choices are 'linear' and 'rbf'), and C (possible choices are 1 and 10).
Then all the following (kernel, C) combinations are automatically generated: [('rbf', 1), ('rbf', 10), ('linear', 1), ('linear', 10)]. Each is used to train an SVM, and the performance is then assessed using cross-validation.
svr = svm.SVC() This looks kind of like creating a classifier, just like we've been doing since the first lesson. But note that the "clf" isn't made until the next line--this is just saying what kind of algorithm to use. Another way to think about this is that the "classifier" isn't just the algorithm in this case, it's algorithm plus parameter values. Note that there's no monkeying around with the kernel or C; all that is handled in the next line.
clf = grid_search.GridSearchCV(svr, parameters) This is where the first bit of magic happens; the classifier is being created. We pass the algorithm (svr) and the dictionary of parameters to try (parameters) and it generates a grid of parameter combinations to try.
clf.fit(iris.data, iris.target) And the second bit of magic. The fit function now tries all the parameter combinations, and returns a fitted classifier that's automatically tuned to the optimal parameter combination. You can now access the parameter values via clf.bestestimator.
Refer to the eigenfaces code, which you can find here. What parameters of the SVM are being tuned with GridSearchCV?
C and gammas
In this mini-project, you’ll start from scratch in making a training-testing split in the data. This will be the first step toward your final project, of building a POI identifier.
You’ll start by building the simplest imaginable (unvalidated) POI identifier. The starter code (validation/validate_poi.py) for this lesson is pretty bare--all it does is read in the data, and format it into lists of labels and features. Create a decision tree classifier (just use the default parameters), train it on all the data (you will fix this in the next part!), and print out the accuracy. THIS IS AN OVERFIT TREE, DO NOT TRUST THIS NUMBER! Nonetheless, what’s the accuracy?
%load validate_poi.py
%%writefile validate_poi.py


"""
    starter code for the validation mini-project
    the first step toward building your POI identifier!

    start by loading/formatting the data

    after that, it's not our code anymore--it's yours!
"""

import pickle
import sys
sys.path.append("../tools/")
from feature_format import featureFormat, targetFeatureSplit
from sklearn.tree import DecisionTreeClassifier

data_dict = pickle.load(open("../final_project/final_project_dataset.pkl", "r") )

### add more features to features_list!
features_list = ["poi", "salary"]

data = featureFormat(data_dict, features_list)
labels, features = targetFeatureSplit(data)

#Uncomment this for the next lesson, evaluation
# features_train,features_test,labels_train,labels_test = cross_validation.train_test_split(features,labels,test_size=0.3,
#                                                                                           random_state=42)
# clf = DecisionTreeClassifier()
# clf.fit(features_train,labels_train)
# clf.score(features_test,labels_test)
from sklearn.tree import DecisionTreeClassifier
clf = DecisionTreeClassifier()
clf.fit(features,labels)
clf.score(features,labels)
Pretty high accuracy, huh? Yet another case where testing on the training data would make you think you were doing amazingly well, but as you already know, that's exactly what holdout test data is for...
Now you’ll add in training and testing, so that you get a trustworthy accuracy number. Use the training_test_split validation available in sklearn.cross_validation; hold out 30% of the data for testing and set the random_state parameter to 42 (random_state controls which points go into the training set and which are used for testing; setting it to 42 means we know exactly which events are in which set, and can check the results you get). What’s your updated accuracy?
features_train,features_test,labels_train,labels_test = cross_validation.train_test_split(features,labels,test_size=0.3,
                                                                                          random_state=42)
clf = DecisionTreeClassifier()
clf.fit(features_train,labels_train)
clf.score(features_test,labels_test)
Aaaand the testing data brings us back down to earth after that 99% accuracy in the last quiz.